Monday, 7 November 2011

The Hammer Burger - recipe.


This is hopefully the first of many guest posts on Lyons Made. Created by Matthew Ryan (@ClaretNBlues on Twitter) is this monstrous 'Hammer' burger. Give it a try and let us know what you thought of it. Cheers Matt!

When Craig asked me to do a guest piece on Lyons Made, the original plan was to submit a recipe for a 'Luther Burger' - a bacon and cheese burger sandwiched between 2 toasted iced doughnuts, drizzled with maple syrup. But I was so desperate to to try my new creation that I decided the 'Luther' could wait.
What I bring you today is something special indeed!. What is it? It's a burger, topped with caramelised onions and a fried egg between two toasted cheese sandwiches. Before you pass judgement, I implore you to try it, you will NOT be sorry you did. (Although your waistline might!)

Ingredients
For the burger (makes around 4)
550 minced beef
25g chopped coriander
1 red onion, chopped
1 tbsp Dijon mustard or half a teaspoon of wasabi.

1 teaspoon ground cumin
1 egg yolk
1 tbsp olive oil
salt and freshly ground black pepper

other ingredients

4 slices of white bread

1 medium onion (sliced)

4 slices of cheese (Kraft or any supermarket brand is fine)
1 free range egg
3 tablespoons of balsamic vinegar 
1 teaspoon of white sugar
2 tablespoons of vegetable or sunflower oil
American Mustard (optional)

1. Place all the burger ingredients in a large bowl and stir well to combine. Using your hands, shape into four equal-sized burgers, I sometimes use a circular cutter. Putting these raw burgers in the fridge for half an hour, may help prevent them from breaking when cooked.
2. Heat the vegetable oil in a medium pan and add the sliced onions. After about 4-5 mins add the balsamic vinegar and sugar to the onions and heat on low/medium for around 25 mins or until caramelised, stirring regularly. If the onions begin to go dry, just add a tablespoon or 2 of water. The vinegar will add a new dimension to your onions.
3. While the onions are cooking, grill or fry your burger to your specifications (about 15 minutes under  grill, turned once), (I like mine medium rare) and prepare your sandwiches for toasting by placing 2 slices of cheese between 2 slices of bread. Now you need to make your toasties, I do mine in the George Foreman grill but they can be done on any grill or in a toastie machine.
4. Now you can fry your egg. Again, you can do this to the specifications you like. I like mine with a runny yolk.
5. When the cheese sandwiches are toasted, place the cooked burger on top of one and drizzle with ketchup. Add the cooked onions on top of the burger. Next place the egg on top of the onions and drizzle with American mustard.
6. Place the second toasted cheese sandwich on top on press down firmly. I usually find at this stage that 15 seconds in the microwave helps it all all gel together nicely, but this is optional.
7. Tuck in and enjoy!
photo by Matthew Ryan

Tuesday, 18 October 2011

Thai infused Pumpkin Soup Recipe

It's fast approaching Halloween and, come to think of it, winter. So that means, the supermarkets are full of pumpkins. Here is a recipe to put this versatile vegetable to good use.
Perfect for them cold days, or to put in a flask for work lunch. this will make at least 4 hefty bowls full. It'll keep in the fridge for a few days, or you could even freeze it if you wish.

Ingredients
1kg of de-seeded, peeled and cubed pumpkin flesh. Or Butternut Squash.
1 Tablespoon Olive oil
1 large onion, finely chopped
1 teaspoon of cumin seeds.
1-2 tablespoons of Thai green curry paste. I used tuk tuk foods brilliant authentic paste.
2 cloves of smoked garlic, crushed. (Substitute with normal garlic if preferred.)
900ml of stock. I used one chicken cube and one vegetable cube.
Juice of one lime
Salt and black pepper
Handful of fresh chopped coriander 
100ml of double cream.

Method
1. Heat the oil in a large saucepan, add the chopped onion and cumin seeds, cook gently for 4-5 minutes, until nearly golden. 
2, Add the curry paste and garlic, and cook for a further 2 minutes, then add the pumpkin, stir well and then cook for another 3-4 minutes.
3. Add the stock, and cook gently with the pan covered, until the pumpkin is soft, around 30 minutes.
4. Season well, with the salt and black pepper, add the coriander, and blitz with a hand blender, or push through a sieve with a wooden spoon.
5. Stir in the cream, and then the lime juice, mix well and serve warm, with home made bread or crusty rolls.

Monday, 12 September 2011

Jamaican Jerk Chicken with Edamame, peas and rice recipe.

Jamaican Jerk Sauce is a fiery marinade, that works great with chicken and pork, I'm sure it would be great with Rabbit and prawns too.  Its primary ingredients are Scotch Bonnet Chillies (one of the hottest chilli peppers on the Scoville Scale) and Allspice (Pimento in Jamaica). Originally Jerk Chicken or Pork was smoked over wood charcoal, Now it is usually grilled. 
Scotch Bonnets can now be found in a larger supermarkets (Tesco in the UK recently have started selling them), also in Indian food shops and the plants are readily available in garden centres. You can use Habanero chillies instead, but Scotch bonnets are more fruity. Likewise you can double up on the peas, if you cannot find Edamame for the rice. Edamame are immature soybeans, green like peas, popular in Asia, most health food shops and chinese supermarkets stock frozen ones these days.
If you do not like your food hot, and I mean hot, I'd give this recipe a miss, but the flavours are intensive and like no other, you can add less Scotch Bonnets, but that kinda defeats the purpose of the recipe. The longer you marinate the meat, the richer the flavour.
Beware Scotch Bonnets are a very potent  100,000 - 350,000 scoville units, for a comparison most jalapeƱo peppers have a rating of 2,500 - 8,000, so please do wear rubber gloves, and treat them with care, avoid scratching ANY sensitive areas whilst preparing them.
This chicken is great eaten cold the next day too, as is the rice.

Jerk sauce marinade ingredients 
3 Spring Onions, roughly chopped
4 large garlic cloves, roughly chopped
1 small white onion, chopped roughly
2 to 4 fresh Scotch bonnet or habanero chillies, stemmed and seeds removed (wear gloves!!)
Juice from 3-4 limes
2 tablespoons soy sauce
3 tablespoons olive oil
1 1/2 tablespoons salt
1 tablespoon soft light brown sugar
1 tablespoon fresh thyme leaves
1 teaspoon of freshly grated or crushed ginger

3/4 teaspoon freshly grated nutmeg
1/2 teaspoon ground cinnamon

2 teaspoons freshly ground allspice
2 teaspoons freshly ground black pepper

Chicken
Legs, Drumsticks and wings 3-4 of each 


Edamame, peas and rice ingredients
2 tablespoons of sunflower or peanut oil
2 onions, finely sliced
2 large garlic cloves chopped finely
1 tablespoon of freshly grated ginger
1 heaped teaspoon of ground turmeric 
450g of cooked rice ( I used Basmati)
100g of Edamame Beans, removed from their pods
100g of Frozen peas.
Salt & Pepper to season

1. Place all the marinade ingredients into a blender or food processor and blitz until smooth, make sure the lid is secured as any splashed into your eyes will not be a pleasant feeling.
2. Put the required amount of chicken into an appropriate sized sealable freezer bag, add enough marinade to cover each piece, and scrunch the bag a few times to make sure the chicken is well coated.
2. Refrigerate for at least 2 hours, over night is best.
3. Cook the chicken for at least 50 minutes at 180°c, the marinade should be black in parts, as pictured, check that chicken is cooked thoroughly. Remove from oven and Rest the chicken for 10 minutes under some lose foil.
4. Heat a work or large frying pan until hot, but not smoking, as this will burn the onion before its cooked, heat the oil and throw in the onions, stir them for 4-5 minutes until just turning brown.
5. Add the garlic, ginger and seasoning to the pan, stir for another minute, then add the turmeric, mix well to combine.
6. Add the pre-cooked rice to the pan and the Edamame and peas, stir fry for another 2-3 minutes until the rice is piping hot and all grains are yellow. Check seasoning and serve, with the chicken placed on top.


Sunday, 21 August 2011

Tempura Prawn with Tukata's Mild Green Chilli & Coriander Salsa recipe

I have just been sent a box load of products from Thai food specialists Tuk Tuk Foods for me to review and create recipes from, so today I got to work on trying them out, and wow, yes wow, such intense flavours and mouth-tinglingly great combinations of ingredients. 
Tuk Tuk Foods is the brainchild of Bangkok born Tukata Bird, 11th of twelve children, Tukata was trained by The Thai Royal Household as her Aunt was a chef there.  Tukata was taught the fine art of pounding, chopping, grinding and combining the highest quality Thai herbs and spices. Tuk Tuk's dips and sauces have won many Gold, Silver and Bronze awards from the Guild of Fine Foods Great Taste Awards. Tukata is based in Stamford, Lincolnshire, England where she can often be seen on her food stall giving demonstrations.
The Salsa recipe is one of Tukatas own, and it is simplicity itself, once tried I am sure this will become a household favourite. I have used a tried and tested Tempura batter recipe thats simple and pretty much faultless. It uses Tuk Tuks Mild Green Chilli and Coriander dipping sauce, which would also be great over fish, crispy beef or pork.
All Tuk Tuks products are suitable for Vegans and Vegetarians, contain no preservatives, artificial colourings or flavourings and are gluten free and wheat free. And even better they are all produced in the UK using fresh ingredients. To order some of Tuk Tuk Foods products please visit their website www.tuktukfoods.co.uk which also has some awesome free Thai recipes to download too.
Ingredients
15 raw king prawns, shelled and de-veined
Pure vegetable oil for frying
Tempura batter mix
1/2 egg beaten
50g plain four plus extra for dusting
Pinch of salt
Pinch of white pepper
Pinch of Bicarbonate of soda
125ml of ice cold lager, I used a Thai beer for more authenticity.

Salsa Ingredients
 2 teaspoon of diced cucumber
teaspoon diced carrot
teaspoon sliced shallots
teaspoon coriander leaves, finely chopped
½ teaspoon lime zest
3 Tablespoons of  Tuk Tuk Foods Green chilli & coriander dipping sauce
Method
1. Combine all the salsa ingredients together in a bowl, stir well and place in fridge until ready to use.
2. Pre-heat a deep fat fryer to 170C, or carefully use a heavy bottomed large pan.
3. Make the batter mix, making sure that the lager is ICE cold, I placed the bottle in the freezer for 30 minutes prior. Place all the ingredients in a large bowl and gently whisk, do not over whisk, its fine to have lumps of flour, this adds to the texture of the batter.
4. Dust the prawns in some seasoned flour, then dip into the bater mix, making sure the whole prawn is coated, then gently fry 4-5 of the prawns at a time in the heated oil, for around 4-5 minutes or until golden and cooked through. ( I always cut one in half, to check they are cooked all the way through). Then drain on some kitchen paper. 
5. Plate the prawns with a small bowl of the salsa for dipping. Enjoy!
Serves two as a starter

Thursday, 14 July 2011

Snickerdoodle Cookie recipe.

These delightful cookies are a real favourite with friends and family, they are crunchy, chewy, cinnamony, sugary biscuits from heaven. Easy to make and will not stay in the biscuit barrel for long! When cooked they look quite a bit like a babies rusk, but are so much more naughty!
The vanilla sugar gives an extra hit of flavour that works so well, but caster sugar also works fine. I usually half the dough, keep one half in the fridge or freezer and use as needed. This recipe will make around 20-24 cookies. This recipe is based upon one I found in the Hummingbird Bakery cookbook, a book well worth getting.

Ingredients
60g unsalted butter, softened
160g Vanilla sugar, or caster sugar
1/4 tsp vanilla essence
1 large egg
275g plain flour
3/4 teaspoon cream of tartar
1/2 teaspoon bicarbonate of soda
Pinch of salt
1/4 teaspoon ground cinnamon

Coating
1 1/2 tablespoons of caster sugar
1 tablespoon of ground cinnamon.


1. Cream together the butter, sugar and vanilla until light and fluffy.
2. Add the egg, mix well and scrape down bowl, mix again to ensure all ingredients are combined well.
3. Sift the remaining ingredients into the mix, you are looking for a soft dough, that doesn't stick to your hands. Add a little more flour if needed, it will not harm the cooking process . 
4. Place the dough in the fridge to rest and firm up, for around 40 minutes. Meanwhile preheat oven to 170°c or 325°f.
5. Mix the coating ingredients into a small bowl.
6. When the dough is firm, break off walnut size pieces, and make into a ball, roll these balls into the coating, make sure they are completely coated. Place the balls of dough onto a tray lined with baking paper, 2 inches apart, as they will spread during cooking.
7. Place in the preheated oven and bake for about 12 minutes, or until they are a light golden brown. They will crack, this is fine. You can add more of the coating after cooking if you wish. Allow to cool on the tray for a couple of minutes, then remove to a wire rack. 

Friday, 8 July 2011

Rabbit Ragu with Spaghetti Recipe

Rabbit is a very underestimated meat, its very low in fat, tasty, and most of all, relatively cheap to purchase. Most people are put off from eating this delicious gamey meat, by the fact that they think of rabbits as fluffy, hopping, children's pets, not a food to be eaten. Wild rabbit has a very rich game taste to it, and some people prefer the flavour of a farmed rabbit, I like both. It has similar texture and cooking methods to chicken.
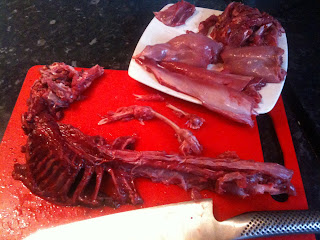
This recipe is inspired by a dish that I tried at Jamie's Italian in Covent Garden. I used one whole rabbit, which I de-boned and filleted myself, (see gory image above!) it easily fed two adults, and there was enough left over for a snack the next day. I would love to hear your experiences of eating and cooking with Rabbit, and please don't be scared to try this, it really is one of the best dishes I have ever cooked.
Ingredients
1 Small red onion, finely chopped.
1 Carrot, peeled and chopped.
1 Thin stick of celery, chopped.
1 Sprig of fresh rosemary, leaves picked and chopped. 
1 tablespoon of chopped fresh thyme leaves.
1 bay leaf.
1 clove of garlic, crushed or finely grated.
1 level tablespoon of flour
1 Whole rabbit, boned and cut into 1cm pieces. (ask your butcher to do this, if you prefer)
1 glass of white wine (as good as you can afford).
250ml of chicken stock.
50g of freshly grated parmesan, or similar hard italian cheese.
Small knob of butter.
Zest of one small orange or a lemon.
Extra virgin olive oil.
Handful of fresh flat leaf parsley.
Spaghetti, enough for two people. 
Salt.
Fresh ground black or mixed pepper.

1.Preheat your oven to 180°c/350°F or gas mark 4.
2. Add a nice glug of the olive oil to a casserole pan, (one which can also be used on a hob) place onto your hob to heat, then add the onion, carrot, celery, rosemary, thyme and bay leaf, and finely add the garlic. Cook these ingredients gently for about 10 minutes, until softened slightly.
2. Stir in the rabbit, sprinkle with the flour, then add the white wine. Season well with the salt and pepper. Pour in the chicken stock, which should just just cover the meat, and bring to a slow boil.
3. Put the lid on the pan, and place in the oven, for around 1 hour 15 minutes, the meat should fall apart when checked. If it doesn't, then cook for a further ten minutes.
4. Add the spaghetti to a pan of rapidly boiling salted water, and cook to the packets instructions.
5. Whilst the pasta is cooking, remove the bay leaf from the stew, add the butter, half of the cheese, and half of the orange or lemon zest. Check the seasoning, and alter accordingly. Place the lid back on, to keep warm.
6. Chop the parsley.
7. Drain the pasta, drizzle it with some olive oil, and place onto two plates. Spoon the Ragu over the top, add the remaining cheese, zest and sprinkle over parsley. I also like to add a few fresh thyme leaves to the plate for decoration too.

Tuesday, 10 May 2011

A simply delicious Green Tea Ice Cream recipe.

I first tried Green Tea Ice-cream when I visited my father in Brisbane, Australia, he had taken me to his favorite Sushi Bar, called Sushi Train and he recommended that I try it, I have been searching for a recipe that came close to the amazing taste of the Sushi Train version. After a bit of trial and error, and research, this is what I have come up with:
Ingredients
100ml Double cream
500ml Full fat milk. (UHT works great)
3 Medium egg yolks
110g Castor sugar
8-10g Organic green tea powder (Matcha) (I find eBay a great place to buy this)
Spring of fresh mint to serve. (optional)

1. Pour the cream and the milk into a saucepan and place over a medium heat, whilst stirring, slowly bring just to the boil, then quickly remove from the heat.
2. In a large bowl cream together the egg yolks, sugar and green tea until it has thicken, then slowly add this mixture into the hot cream/milk mixture.
3. Pour the mixture back into the saucepan over a lowish heat and cook for around 12 minutes, continually stirring with a wooden spoon, until the mixture thickens enough to coat the back of the spoon. Do not over cook this mixture as it with curdle and ruin.
4. Sieve the mixture into a clean bowl and allow to cool completely.
5. Place into an ice-cream machine until frozen.
Alternatively if you do not have a machine, place into a freezable container and freeze for two hours then blitz it in a food processor and repeat this process 3-4 times.
6. Remove from freezer/machine, place in a food processor and blitz until smooth and refreeze until needed. This process really smooths the ice-cream and gets rid of any ice crystals that may of appeared.

Thursday, 28 April 2011

3 Summer Smoothie recipes


Hi, all sorry for the delay in new posts, been a little hectic this end, but i have got a long list of updates to upload, so keep an eye on the page over the next few days/weeks.
As the Spring weather seems to have been more suited to summer, over here in the UK, I have dusted off my Smoothie machine, and been creating a few new drinks. Heres a few quick and easy recipes for a some smoothies, delicious and filling, and a great start to any day, or just as nice when your unwinding on your patio in the evening. Best drank with a thick straw and immediately.


CocoNapple Smoothie (pictured)
TOP TIP: to check if a pineapple is ripe, hold one of the leaves, and if it comes out easily, it'll be ripe. Also, if you give it a good sniff, you should be able to smell the sweetness.
Ingredients
1/2 a very ripe pineapple, core removed and roughly cubed.
120ml of Coconut Milk, the thick stuff from the top of the can is best.
100ml Full fat milk
3-4 Ice cubes
1. Add the Pineapple and ice cubes to a blender or smoothie machine, blitz with the milk.
2. Pour in the coconut milk and wizz away, until smooth and creamy. Decorate with a slice of pineapple or a pineapple leaf. Drink immediately.


The Nutty Banana Smoothie
TOP TIP: for extra smoothness, peel the bananas and place in freezer for a few hours in a freezer bag.
Ingredients

2 tablespoons of smooth peanut butter
2 Ripe bananas (best if been frozen first)
500ml Semi-Skimmed milk
3-4 Ice cubes
Optional: A sprinkle of cinnamon 
1. Add the Bananas and ice cubes to a blender or smoothie machine, blitz with the milk.
2. Drop in the peanut butter and wizz away, until smooth and creamy. Decorate with a sprinkling of cinnamon. Drink immediately.

The Mmmmmango Smoothie
Ingredients
1/2 a very ripe Mango, stone removed and cubed.
1 Ripe banana (best if been frozen first)
200ml Plain yoghurt 
200ml Full fat milk
3-4 Ice cubes 
1. Add the mango, banana and ice cubes to a blender or smoothie machine, blitz with the yoghurt.
2. Add the milk and wizz away, until smooth and creamy. Drink immediately.

Tuesday, 29 March 2011

Scone in 60 seconds . . . . . . well, 20 minutes actually.

Scones, pronounced however you feel, are a small bread of Scottish origin, but eaten all over the world. Famous as a component of Devonshire Tea. Otherwise known as "Rock Cakes," "Fat Rascals," and "Singing Hinnies".
They can be awkward to get right, overcook them and they are more stone than scone, undercook them and they fall to pieces and taste yuck. I'm certainly no expert at making the perfect Scone, far from it, more disasters than successes. This is a recipe that seems to work for me.
As a variation, throw in a handfull of raisins, before adding the milk.


Ingredients
225g Self-raising flour
35g Castor sugar
Pinch of salt
30g Butter (extra for greasing, but I prefer to use a baking sheet)
up to 150ml Full fat milk (you may not require the full amount.)
1 egg, lightly beaten to glaze.

Serve with:
A quality clotted cream
A good jam of your choice. Strawberry is a favourite.

1. Pre-heat oven to 210c
2. Place flour, sugar, and salt into a food processor, and quickly mix. Add the butter and mix again until it looks kinda like small breadcrumbs.
3. Slowly pour in the milk, whilst mixing, until a dough forms, it needs to be quite moist, but not so it sticks to the side of the bowl. You may not need the full amount of milk, so go slow.
4. Heavily flour a clean work surface, make the dough into a ball, and flatten until about 2cm thick.
5. Using a 4-5cm round cutter, cut out the scones, this mix should make around 9-11 scones.
6. Place the scones on a lightly greased tray or I prefer to line one with a baking sheet, lightly brush the scones with the beaten egg, and bake for around 12 minutes, or until they have risen and turned a light golden brown. Remove from oven and slightly cool on a wire rack.
7. Best eaten warm, cut in half, then add a spoon of clotted cream, and a good spreading of jam.

Wednesday, 23 March 2011

Scrumptious Chocolate cup-cake type thingys

I have been through a bit of a baking experimental stage, of late. Cookies, cakes, bread, pastries and cup cake type thingys. "What is a cup cake type thingy?" I hear you all say. Well I keep forgetting to buy cupcake cases, so i improvised at little, by using a silicone muffin tray/mould, and no cases. This was the pleasant result I got. This mix makes around 10-12 cakes.


Ingredients 
5oz Self raising flour
1 1/2oz Drinking chocolate
1 1/2oz cocoa powder
6oz Castor sugar
3oz Sunflower margarine
3oz Unsalted butter (softened) 
3 Large eggs
3 Tablespoons of hot water.

1. Preheat oven to 140 degrees.
2. Lightly butter the muffin tray, it does not have to be silicone. Place in fridge to chill the butter. (This will help prevent the cakes from splitting when removing from mould.)
3. Gently mix together all the ingredients, except the water. Do not over mix as this will make the cakes stodgy.
4. Slowly add the water, whilst mixing, until a smooth paste is formed.
5. Pour the mix nearly to the top of the moulds.
5. Place in the pre-heated oven for around 35 minutes, or until the cakes feel springy to the touch.
6. Remove from oven. Leave to cool in the tray for a few minutes, then gently prise from tin/mould and leave to cool completely on a wire rack.

Coconut and Vanilla Frosting
Ingredients
4oz softened butter
6oz icing sugar
2 tbsp Coconut milk or coconut cream

Seeds from one vanilla pod, or 1/2 teaspoon of vanilla extract.

1. Beat the butter and half of the icing sugar until smooth.

2. Add the rest of the icing sugar, beat again until smooth. Scrape the sides of bowl to make sure all is mixed well.
3. Add the Vanilla and coconut milk/cream, beat until very smooth.


Constructing the cakes
1. Once the cakes are cooled, using a sharp bread knife, carefully cut the tops off, creating a nice flat surface. Using cookie cutters/shapes cut stars, hearts, circles or whatever takes your fancy, from the cake tops.
2. Place frosting into a piping bag, or a freezer bag with the corner cut off, and generously pipe onto the cake. Then add your cut out shapes, dust a few with icing sugar and impress your friends with the finished pieces of art!


You can also use the cut-off tops sandwiched together with the frosting, as shown.

Many thanks to Julia England (@ on twitter, who also has a great blog A wanna be foodie!) for providing me with the basis of this recipe, general advice and all-round-good-banter!

Thursday, 10 March 2011

Lollytastic!


Some of my twitter followers may be aware that I have recently purchased some vintage 1950's ice lolly moulds, especially Julia England (wannabefoodie76 on twitter), as Julia kindly bought my attention to the ebay auction, also the fact that she had forgotten her password and username, helped my cause no end!
These moulds are great, easy to use and the kids love them! So over the coming months and especially when Summer arrives I will be experimenting with flavours, textures and techniques, and hopefully bringing to you some amazing lollies!
Lolly moulds in all shapes and sizes are easy to find in most homeware shops, go get some!

Apple 'n' Cinnamon Ice Lolly.
A nice healthy easy one to start, and just three ingredients!
Ingredients
200ml of Pure Apple juice (as always, get the best that you can afford)
Pinch of ground Cinnamon 
A squirt of honey.

1. Place the ingredients in a jug, and mix well. (You may need to heat a little to get the honey to dissolve)
2. Carefully pour the mixture into moulds.
3. Place in freezer, being careful not to spill, and leave to set, around 3-4 hours.

Please adjust quantities to suit your moulds.

Monday, 28 February 2011

Pascale Saturday!

I have been watching "Baking made easy" on BBC 2, featuring Lorraine Pascale, and my lovely wife bought me her cook book that accompanies the series. So on Saturday it was "Official Pascale Day" in my kitchen, these are a few of her recipes that I tried. And I must say so myself they all turned out perfectly.
I wholeheartedly recommend Lorraine's book, and that you watch her show, its a hive of wonderful tips, recipes and yummyness!

First I made the sausage rolls, the instructions were so simple, and tasted divine, so much better than shop-bought ones.
I have been meaning to do my own bread without the aid of a breadmaker, for some time now, and I now wish I had done it ages ago, the Focaccia was a doddle to do, and it tastes like no bread I have ever bought before, really people you have to give this one a go.


Then I attempted the brandy snaps. These were not so simple, but in the end I think I mastered them, and they were scrumptious, crispy and fun!

Thursday, 3 February 2011

MMMmmmango Ice-Cream.

This is great for kids and adults alike. Quick, easy and delicious.
I used a battery operated ice-cream machine, but if you do not have one, you can still create this.
Just place the ice cream mixture in a suitable freezer container that has a lid, and stir with a fork once every half hour, for the first four hours of freezing. This breaks up the ice crystals and makes for a smooth texture.
Also if you do not have a food processor, you can use a hand held blender and a big bowl. 
To add some bite to this, just before you place in the freezer add some fresh mango cubes. Luvly!

Ingredients
  • 3 very ripe large mangoes. (must be soft to the touch and sweet!).
  • 1 397g tin of condensed milk.
  • 150ml of double cream.
  • Juice of one lime (optional)

1. Cut around both sides of the flat stone inside the mango. Over a food processor bowl, scrape and squeeze all the flesh and juice from the mango, making sure no skin gets included. (There is a great video guide here to show you how its done.). 
2. Blend the mango flesh into a smooth puree. 
3. Slowly add the condensed milk, blending all the while, until its whipped and airy.
4. Pour in the cream, and if using, add the lime juice and mix until the mixture is smooth. I find this takes around 2 minutes. 
5. Place the mixture into your ice-cream machine and place into the freezer and turn on. Leave overnight, or until firm.
6. Remove from freezer 10 minutes before serving.

Tuesday, 25 January 2011

Tinned Tuna & Onion Sushi Maki Recipe!


Just the word 'Sushi' seems to put many people off. And that is because they wrongly think that Sushi = RAW fish. Wrong, wrong, wrong! Sushi in fact means 'Rice that is vinegared with a topping of raw, cooked or marinated, fish, shellfish, meat, vegetables or egg.
Sushi comes in many forms, including bowls of rice with scattered fish, meat and veg, hand rolled sushi with a seaweed covering and stuffed sushi.
Sushi is one of the most healthy foods you can create, and its also very artistic and impresses every one who see's it!
Everyone should try sushi, if your not keen on fish, its great with cooked chicken, beef or veg, such as cucumber, carrot and peppers.
The key to good sushi, is most definitely the rice, get this right and everything else is easy!
And the ingredients are now readily available in most large supermarkets, or if you live local to me, try Janson Hong on Bridge Street in Peterborough, they have everything that you need at prices that cannot be beaten. Also you will need a bambo sushi rolling mat (Makisu).

Sushi Rice.
Ingredients.
300g (10oz) Japanese Sushi rice (no other rice will work)
330ml water
4 tablespoons of Sushi rice seasoning. (vinegar mixture)
2inch strip of Kombu (optional, but recommended)

1. It is very important to clean the sushi rice well, as this helps the rice to stick together. I find the easiest way to do this is to get a fairly large bowl fill it with clean cold water, and place the rice in a seive, and submerge it into the water, wash the rice thoroughly, and keep changing the water until it becomes clear and is no longer cloudy. Drain the water and let the rice stand for at least 30 minutes.
2. Put the washed rice into a heavy based saucepan, add the water and kombu (if using), cover with a close fitting lid. Bring to the boil over a medium heat until boiling, do not be tempted to lift the lid, listen for the boiling to commence, then boil rapidly for 3 minutes.
3. Reduce the heat to low and simmer for 10 minutes, remove from heat and let stand with the lid still on for a further 10 minutes.  Lift lid and throw away the Kombu (if using)
4. Transfer the rice to a large salad bowl (preferably plastic), I like to add a few drops of the vinegar mixture to the bowl beforehand and smear, this prevents the rice from sticking to the bowl. Spread the rice evenly in the bowl and slowly add the rest of the vinegar mixture a little at a time, whilst using a spatula in a slicing action (do not stir!) to make sure every grain of the rice gets coated.
5. The trick to really sticky rice, is to cool it very quickly, this can be done by fanning the rice, with a thin chopping board or a piece of card etc. You can speed the process up by spreading the rice on a large clean baking tray, then fanning it. It needs to be cooled to room temperature before you even attempt to use it.

Rolled sushi (Maki Zushi) shown on the left of the plate above.
Ingredients.
2 small tins of cooked tuna (preferably in spring water)
1 small onion (chopped very finely)
1 tablespoon of mayonaise
Juice of one lime
Pinch of salt.
4-5 sheets of Nori (rolled dried seaweed)
Wasabi (Japanese horseradish, optional)

Filling.
1. Drain the tins of tuna, and tip into a bowl, add the finely chopped onion, mayonaise, lime juice and salt, stir well.


Construction.
1. Lay your bambo sushi mat on a work surface and place one sheet of Nori, shiny side down on it. Dip your hands in vinegard water, to prevent the rice from sticking to them, form two handfuls of the rice into log shapes and place into the centre of the Nori. (see picture 1.).
2. Spread the rice evenly and gently over the Nori, making sure you leave a 1inch gap at the top, and also try and get the rice as close to the edges as possible. If you like a hint of heat, place a small squirt of wasabi on your finger and spread it gently in a line on the rice. You really do not need much of this stuff, so be warned!
3. Place the some of filling in the centre of the rice, in a long sausage shape, about 1.5cm high (see picture 2.). Now were ready to roll!
4. This is the fun part. Place your thumbs under the bambo mat, and lift the nearest edge to you, and gently tuck the closest edge to you in, making sure it goes over the filling, then bring the mat down and gently squeeze. Then lift the font edge of the mat with one hand, and push the roll forward with the other, so that the uncovered piece fo Nori, seals the roll. It should lot a little similar to a sausage roll. Easy. yeah??  =)
5. Flatten the mat out and tidy the ends of the roll. Set aside in a cool place, not the fridge, as this will dry the rice out. And do the same with the other sheets of Nori.
6. When all the rolls are completed, get a moistened super sharp knife and cut into slices.
Practice really does make perfect. You'll probably struggle the first time, but please, please do not give up. You will get it eventually.
   These are great with all kinds of filling, prawns, breaded chicken, raw tuna, peppers, cucumber, tofu etc.
They really are best eaten pretty quickly after they are made, but can be stored in a sealed tub at room temperature for a couple of hours max.
    The main photo also shows the same filling in a battleship sushi (gunkan maki) and vinegar prawn temari sushi. I'll show you these another time! =-)

Tuesday, 18 January 2011

Bravo Brownies

So continuing on a chocolate theme, thanks to a kind donation of a massive tub of quality chocolate nuggets, heres my next waist widener!
Everyone loves a gooey sticky Brownie. And I am no different.

There are loads of recipes around for brownie, some good, some bad, this one works for me. As with any recipe that includes chocolate, the better the chocolate, the better the taste, same goes for cocoa powder, buy the best that you can afford, your taste-buds will thank you for it!

Ingredients


  • 250g unsalted butter (yes, that is a whole pack!!)
  • 200g Dark chocolate (at least 70% cocoa solids) bashed up.
  • optional: 100g chopped nuts (I prefer brazils or almonds)
  • 60g cocoa powder, sifted
  • 65g plain flour, sifted
  • 1 teaspoon baking powder
  • 350g caster sugar
  • 4 large eggs

1. Preheat oven to 180c, get a baking tin (around 25cm in length) and line it with greaseproof paper.
2. In a largish bowl or dish, melt the chocolate and butter over some simmering water, stirring until smooth. (be careful that the bowl does not touch the water, as this will ruin the chocolate.)
3. In a separate bowl sift the flour, sugar and cocoa powder, then add the melted chocolate and nuts. Mix well, until all the ingredients are combined.
4. Beat the eggs, then add to the other ingredients, stir until silky and shiny, and when you can see no egg, pour the mixture into the lined tray.
5. Place in the oven for around 20-25 minutes, the outside wants to be bouncy and cracking in places and a knife or skewer should still come out sticky, when inserted into the brownie. The trick is to get the timing spot on. So check a couple of times if needed.
6. Allow the brownie to cool, for a couple of hours, then remove from tin and chop to desired sizes.

This is great from the fridge, or warmed with vanilla ice-cream or clotted cream. It'll keep for around 4-5 days in a sealed container.

Monday, 17 January 2011

Choco Pavement!


This is my version of Rocky Road, but you can throw anything you like into the chocolate syrup mix, nuts, marshmallows, biscuits, brownie, chocolate bars, dried fruit, raisins, jellied sweets, cereals and whatever else you have in your sweet cupboard!
  The one ingredient you should definitely add is salted peanuts as these give a real hit of salt, that goes so well with the chocolate. So please use this recipe as a guide and chuck in whatever ingredients you fancy into the chocolate syrup mix. And obviously the better the chocolate you use, the better the taste.

Ingredients
Chocolate Syrup mix

  • 300g of good quality Chocolate 70% cocoa (use dark or milk, or a mixture of both). 
  • 125g unsalted butter.
  • 2 tablespoons of golden syrup.

Added extras

  • 200g salted peanuts.
  • 8 marshmallows chopped in half, or a handfull of mini mallows.
  • 50g of roughly pistachio nuts
  • 30g of rice krispies (puffed rice)
  • 25g of roughly chopped brazil nut


1. Make the chocolate syrup by melting all the ingredients together in a bowl placed over a saucepan with couple of inches simmering water, make sure the bowl does not touch the water, else you will ruin the chocolate. Stir constantly until silky smooth.
2. Add your chosen ingredients to the melted chocolate syrup, and mix well. Pour into a tin foiled lined tray or tub, let it cool and refrigerate for around 3-4 hours until its set solid.
3. Remove from the tinfoil, and cut into bite-size pieces and place in the fridge in a sealed container until ready to eat! This will keep for around a week, but you'll not have any left by then!!!!

Sunday, 16 January 2011

Choc n nana shake

1 minute to make, time it.
This makes around 1 1/2 pints.

Ingredients

• 1 large ripe banana.
• 4 heaped teaspoons of choc milk shake powder (Nesquik etc).
• pinch of cinnamon powder.
• 1 pint of milk (565ml) (full fat is best)


1. Mash up the banana with a little of the milk, until it has no lumps, I use  a food processor, a hand held blender works fine too, as would a fork!
2. Add the rest of the ingredients, and blitz for 20 seconds.
3. Pour into frozen glasses if possible. Guzzle!

Tip: For a thicker shake before blitzing add a scoop of ice-cream, chocolate or vanilla, you could also freeze your banana before hand.

Saturday, 15 January 2011

Chunky Onion Bhaji's


These are delicious and I challenge anyone not to eat them all up in one go! I have tried a few bhaji recipes, but none hit the spot, so a few tweaks of my own and I think this is the best onion bhaji recipe on the net.
These are not like traditional bought bhaji's, they have a bit of bite and a crispy texture. They also freeze well, and are great with a squeeze of lemon on them. So easy to make too.

Ingredients

  • 1 large onion, sliced into 1/2cm wide slices.
  • 2-3 tablespoons of flour, preferably Gram flour
  • 1 teaspoon cumin powder.
  • 1 teaspoon turmeric powder.
  • 1 teaspoon of garam masala. (homemade is best)
  • 1/2 teaspoon of chilli powder.
  • 1/2 teaspoon of dried coriander.
  • salt.
  • water.
  • Cooking oil for frying.

1. In a large bowl add the flour, coriander and all the spices, mix well then add salt to taste.
2. Slowly add water to the bowl and mix to a very sticky paste.
3. Add the sliced onion to the paste and mix until all the onion is covered.
4. Heat the oil until hot enough to turn a cube of bread brown, pretty quick, around 140c. A deep fat fryer is great for these.
5. Add egg size clumps of the mixture to the fat. Cook two at a time for 4-5 minutes turning occasionally, remove when crisp and golden, drain on plenty of paper towel, and serve.

Friday, 14 January 2011

Chicken, bacon, leek and bourbon pie

Ingredients.

  • 2 chicken breasts, cut into bite-size pieces
  • 3 medium leeks, clean and copped into 1cm rings
  • 5 slices of bacon
  • 400ml chicken stock
  • 150ml double cream
  • 1 tablespoon of Jim Beam bourbon, or any whiskey
  • 1 clove of garlic, crushed
  • 1 tablespoon of fresh rosemary, chopped.
  • butter
  • 1 egg
  • Half a packet of pre-bought puff pastry, at room temperature.
  • Salt and pepper to taste.


Preheat oven to 220c.
1. Fry the bacon in some butter until nearly crisp, in a saucepan larger enough to take all the ingredients, remove and place on a plate to rest, keep the juices for step 2.
2. In the same saucepan, and a big knob of butter and cook the leek over a medium heat until soft, but not browned, the add the garlic and cook for a further minute.
3, Add the chicken pieces cook until sealed (when all the pink vanishes), then add the rosemary.
4. Pour in the chicken stock and bring to the boil, then turn down heat, add the rested bacon, season with the salt and pepper and simmer gently for ten minutes.
5. Whilst the filling is simmering, roll the puff pastry to about 3mm thick and to the size of your oven-proof dish, I use a 8" x 12" dish. Use the bottom of the dish as a cutting guide.
6. Add 150ml of double cream and the bourbon/whiskey and simmer for a few more minutes.
7. Pour the contents of the saucepan through a colander, and catch the gravy in another bowl, I usually let this sit for about five minutes. Place the drained filling into your oven-proof dish and carefully top iti with the puff pastry,
8. Beat the egg in a small bowl and brush over the pastry, I normally gently score the pastry with diagonal lines, being careful not to cut all the way through the pastry. Place the pie into the oven and cook for around 20 minutes, or until the pastry is golden brown and crispy.
9. Serve with the drained gravy and some lovely potatoes and veggies, or its just as yummy with home made fries!

Friday, 7 January 2011

Classic vanilla in meringues with sugared pistachios

Had to show you this. I have just demolished it in under 5 seconds! Homemade ice cream is the best. Recipe and info to follow in the next day or so.

Wednesday, 5 January 2011

Best Brunch ever?

Add a perfectly poached egg to a crispy hash brown (see below for recipe), sprinkle with salt, and devour!

Tuesday, 4 January 2011

Pan fried pork loin served with hash brown and leeks with pancetta.

I managed to grab myself eight boneless pork loins for £3 today, so had a look in my fridge and cupboards to see what I had, and this is what sprang to mind. The only thing that took any time was the hash browns, the rest is a ten minute cook! I have had a couple of requests, and I think this will suit them both, one request was for a Valentines recipe, I think this would suitably impress any of your chosen Valentines, and also my Welsh banter boy wanted some leek recipes. BINGO!
The hash browns can be cooked in advance and then heated up in a little oil in a frying pan, just do not brown them up so much in the fryer! They are great with a poached egg on top too. =)

Serves 2, with extra hash browns for brunch!
Ingredients
Hash Browns

  • 3 medium sized maris piper potatoes. (Makes 5-6 hash browns.)
  • Salt
  • Vegetable oil for frying the hash browns.

Leek and Panchetta.

  • 3 medium sized leeks, chopped into 1cm circles.
  • 3 slices of pancetta or bacon, chopped roughly.
  • 1 teaspoon of fresh rosemary
  • 1 clove of garlic.
  • large knob of butter
  • salt and pepper to taste.
  • 1 tablespoon of whisky or bourbon.

  • 2 boneless pork loins
  • olive oil and a knob of butter for frying.

1. Start by preparing the hash browns. Pre-heat oven to 180c. Place the 3 potatoes on a baking tray and cook in the oven for 30-35 minutes, turning half way so that the skin does not brown too much on the bottom. They want to be firm, not cooked all the way, so that they are too soft to grate.
2. Remove from oven and allow to cool a little. Peel the potatoes using a knife, the skin should just come off easy, I hold the potato in a clean tea towel, as they are pretty hot. Then using a cheese grater, grate the potatoes into a bowl, using long strokes to get long pieces of potato. Add some salt to the bowl and gently stir.
3. Using a ramekin or round cookie cutter, press a large tablespoon of the potato into it quite firmly (they want to be around 1.5-cm deep, then turn out onto a plate, repeat this process until all your potato is used up. Place the plate in the fridge so they can firm up, which takes around half an hour, this prevents them from falling to pieces in the hot fat.
4. Meanwhile heat some olive oil and a knob of butter in a pan over a medium heat, until the butter has melted, season the pork loins and add to the pan, cook on both side for around 5 minutes or until cooked through, I find that if you baste the pork a few times with the juices and butter, they stay more moist. When cooked, remove from pan and rest on a plate whilst you do the final steps. Leave the juices in the pan for step 6.
5. Heat a deep fat fryer to 180c and add 2 of the hash browns cook for 5 minutes turning them over once or until they are golden and crisp, remove from the fat and drain on a paper towel. (if you do not have a deep fat fryer, you can use a saucepan)
6. Whilst the hash brown are cooking, in the same pan that the pork was cooked, add a little more butter and gently fry the leeks and garlic until they soften a little, then add the rosemary and bacon, cook until the bacon is crisp, then add seasoning and finally the special ingredient, that makes hell of a difference, whiskey, cook for a further minute.
7. Serve by spooning the leeks and pancetta into the middle of the plate, place the loin on top, then the delicious golden-crisp hash brown. Sprinkle the hash brown with a little more salt, and tuck in!

Sunday, 2 January 2011

The BEST Roast Potatoes, without fail!

Making good roast potatoes, is not something that everyone can do, but if you follow these instructions, you'll not go far wrong. I have found that Maris Pipers work best for me, but King Edwards are also great. And if you cannot get goose fat, duck fat or even lard/dripping works wonders too.
These potatoes, freeze great once they are cold. Just put them in a freezer bag, then when needed whack them on a empty/dry baking tray and cook at 220c for 20 minutes and they are great! I also love them cold the next day.
Ingredients

  • 4-6 Largish Maris Piper potatoes.
  • Goose fat.
  • 2 tablespoons coarse semolina.
  • Sea salt.

1. Pre-heat your oven to the highest temperature available.
2. Peel potatoes, and leave whole, wash under cold water for a few minutes, then rest in a saucepan of clean cold water, for around an hour. Then cut into pieces that are all roughly the same size, try to make sure they have at least one big flat surface, and that they are not too small.
3. Place in a saucepan of cold water, and bring to the boil, then boil for a further 3-4 minutes until the outside is just soft. then drain in a colander, and leave them to dry in it for around 5 minutes.
4. Return to the empty saucepan, add 2 tablespoons of semolina, and place a lid or plate onto the saucepan, and turn upside down and shake gently a few times, to bash up the edges of the spuds, and evenly coat them with the semolina.
5. Add enough goose fat, that when it is melted it goes around 1cm high, into a high sided oven tray, and place in the oven, you need to get this fat really, really hot, so hot that it smokes.
6. Carefully, and I mean carefully, remove tray from oven, and gently place the potatoes evenly in one layer, making sure the flat edge is not face down in the tray, they may bubble and spit, so beware. Turn oven down to around 240c. Cook in the oven for around 25 minutes.
7. Remove from oven, then turn potatoes over so that the flat edge is on the bottom, and cook for around another 20 minutes until brown, and crisp all over. Remove, and sprinkle with a generous helping of the sea salt. Enjoy!